Today will mark the last exam for Eric's first semester!
How quick time flies.
Hope he does well and have a good celebrations with his coursemate tonight.
For me, I shall enjoy my evening with my home make french baguette and heading out to easy english bible study.
This shall be my first time joining them. Looking into doing ministry work there, teaching people about the bible. Please pray for me as I look into this ministry at church and the opportunity to serve.
Hope you have a good evening too!
kcan
17 June 2013
Sweet Potato Hee Pan
Thank you Hakka Chan for the recipe!
If you'd like to visit her blog with this recipe, here is the link to Hakka Chan.
The recipe for Hee Pan. As usual, I did a little alteration to the recipe as I go. Mainly because the dough seems quite dry with the amount of water given. I half the recipe given by Hakka Chan. =)
In the end, I made 25 little golden Hee Pan.
200 g Steamed sweet potatoes
250 g Glutinous flour
350 g Plain flour
100 g Rice flour
100 g sugar
325 ml Lukewarm water (I mixed the water from my steamed sweet potatos with plain water)
2 tbsp cooking oil for the dough
1 tbsp yeast (I dissolved it with some lukewarm water from above)
2 tbsp cooking oil for moulding.
Use a good big wide pot as the amount of flours added to be quite a big dough. A good pot with flat base will be ideal.

Making into small balls. Letting it rise again.

Stacking them up in Steamy! Can't wait!

Tada! Just hot out of the steamer. =)

Yummmmm~!

If you'd like to visit her blog with this recipe, here is the link to Hakka Chan.
The recipe for Hee Pan. As usual, I did a little alteration to the recipe as I go. Mainly because the dough seems quite dry with the amount of water given. I half the recipe given by Hakka Chan. =)
In the end, I made 25 little golden Hee Pan.
200 g Steamed sweet potatoes
250 g Glutinous flour
350 g Plain flour
100 g Rice flour
100 g sugar
325 ml Lukewarm water (I mixed the water from my steamed sweet potatos with plain water)
2 tbsp cooking oil for the dough
1 tbsp yeast (I dissolved it with some lukewarm water from above)
2 tbsp cooking oil for moulding.
Use a good big wide pot as the amount of flours added to be quite a big dough. A good pot with flat base will be ideal.
- Sieve the flours and mix it all together with sweet potatoes, sugar and oil.
- Make a well in the center of the mix and add the lukewarm water slowly, using your finger to slowly mix the flour to the water to form a sticky soft dough.
- When well mix, add in the dissolved yeast into the dough. Gently kneading and mixing it. (If by this time, the dough is still quite dry and not sticking together, add more lukewarm water by sprinkling it onto the dough with your fingers. This helps to prevent adding too much water by accident.)
- Knead the soft dough for 20 mins, till it forms a nice dough that does not sticks to your finger or the pot.
- (I will be putting a video up on how to knead a dough)
- When the dough is smooth and soft, let it rest for 1 hr in a warm place. (In my case, it is the oven which I had warmed up slightly) The size of the dough will be around double in size. If not, let it sit for a little longer.
- During the waiting time, wash and cut up banana leaves into squares, or baking paper if you don't have. Banana leaves helps gives a nice fragrance when steamed. Let the banana leaves dry.
- When the 1 hr is up, give the dough a few strong knead to push out all the air trapped inside the dough.
- Moisten the palm with some oil and pinch some dough. Mold it into even ball size and place it on the banana leaf. Flatten the top slightly. Let it rise again for about 30 mins.
- Heat up the water and when the water is boiling, put the dough+leaf onto the steam rack and steam for around 15-20mins.
- When the time is up, be careful lifting up the steaming lid. Avoid dropping the water onto the buns, or it will turn 'ugly'.
- Cool it on a rack or on top of old newspaper to absorb/evaporate the steam. When it is cooled, keep it in an air tight container.
I love my Hee Pan cooled than hot from the oven. =) How about you?
My verdict: Taste wise, yummy! Size wise, I wonder if the weather is too cold for the yeast to work. Haha. I may add a little more water next time so that the dough is softer and 'sticky-er' so that the real shape of Hee Pan can be made. =p
But non-the-less, this recipe shall be in my book for years to come! ^_^
(if you don't have sweet potatos, can just omit them. May need to add more water. If you like yours pink, add a drop of pink food dye at step 4.)
The dough after rising.
Making into small balls. Letting it rise again.
Stacking them up in Steamy! Can't wait!
Tada! Just hot out of the steamer. =)
Yummmmm~!
Hope you enjoy it too!
kcan
Exciting time awaits!
I grew up in a Hakka village in Malaysia, with both my mum n grandma's family being Hakka.


The final product, let to proof in a warm oven or a sunny place. The weather is so cold here. So I had to put it in a warm oven.

We had a neighbor just across from my grandparents's place, whom make and sold traditional Hakka kuehs from his family home. I remembered following my mum to their place in the afternoons to buy those fresh out of the steamer kuehs. And their sweet aromas just sticks in my memory. Even the burning wood they used to fuel their steamers. Every now and then when I smell the burning fire place, my memory will take me back to my grandparents's place and the aroma from the neighbour's kueh factory.
Among the many traditional kuehs, my favorite is the the Pink kueh and the vege kueh. Longing to taste the sweet chewy buns, I looked up on the Internet for someone special to post the recipe. And here it is! Hee Pan 喜板.
Thank you Hakka Chan for the recipe!
At the time of posting, I am now waiting patiently for the kueh to proof in the warm oven. But I can already smell the sweet familiar fragrance. A smell that is so different to making bread. It must be the different rice flours that is commonly used in Asian kuehs.
Some picture for you to see.
Kneading the dough.
Now, I wait.
Will update you again.
Kcan
10 June 2013
Pickled green chilies
Went to the veges shop after bible study on Wednesday to get some eggs. Saw them selling a pack of green chilies at $1/pack!
I don't take much chilies in my meals. But I do love a good pickle green chilies to go with my fried noodles! =D
Firstly, gave mum a called to ask for recipe.
Washed the green chilies and dried them overnight.

Sterilized a glass jar by cooking the bottle n lid in a hot boiling pit of water. Boil for 10 mins.

Add about 4 tablespoon of sugar (I use raw sugar) and pour in white rice vinegar till it covers the top of the chillies. If you have excess amount of lemons or limes at home, you can substitute it for vinegar, giving it a more fruity taste. According to mum, sugars give the chillies a good crunch n colour, instead of turning them soft n yellow.

I don't take much chilies in my meals. But I do love a good pickle green chilies to go with my fried noodles! =D
Firstly, gave mum a called to ask for recipe.
Washed the green chilies and dried them overnight.
Leave it to dry. Careful not to touch the insides if the jar n lid.
Using a scissors, cut the chillies straight into the jar.
I seal it with a glad wrap and cover it with the lid. I placed it in the fridge, and it shall be ready to eat in few days time! =)
Definitely going to buy some noodles for stir fry!
Kcan
07 June 2013
After dinner dessert- chocolate pudding
We loves to have some sweet treats after dinner in some weeks. Especially after a long hectic day at work, or in Eric's case, at uni.

Look at the melting chocolate at the bottom!

I only like desserts that are simple n easy to make. Of course, yummy to eat too!
We came across this a few weeks ago at our local Coles supermarket. Half price! =D
My first time trying out the Greens Chocolate pudding.
It was for 4-6 servings. So I made 4 as there's only 3 of us at home now.
The instructions were simple n straight forward.
Here's the chocolate puddings, straight out of the oven!
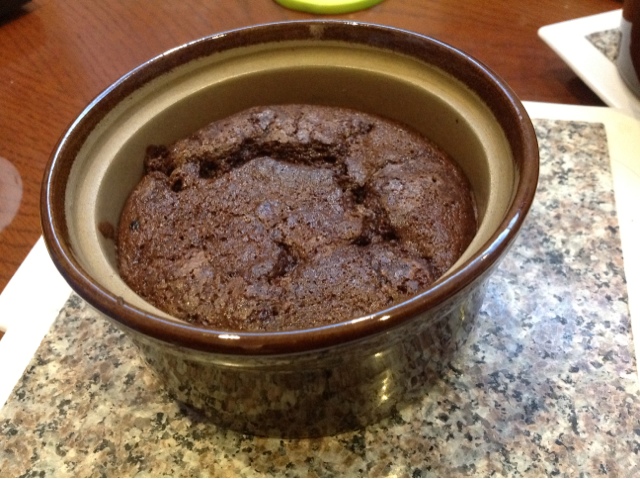
Nice looking cracks in the middle. Looks like a volcano going to erupt. Haha.
Digging into the hot pudding.
Oh my, the insides were still in liquid form! Just like a chocolate lava cake. *yumm!*
Nice and warm for the cold winter nights.
We all finished our share of chocolate pudding and could have no more.
The puddings were very sweet. So much so that we got sick of eating it after a few bites. So that's why it could have 6 servings.
We kept the remainding pudding in the fridge and had it cold the next day. It tasted like cold custards!
Yumm!
Will try the other Greens products next time they are on half price sale. =D
Kcan
06 June 2013
Black sesame bread loaf
The bread basket rack was empty again. Thinking what kind of bread should I bake this time, I decided to make use of the well expired black sesame powder belonging to my MIL, sitting in the fridge.
I've been trying out with making white loaf from Happy Home Baking. And this recipe has turned out quite well each time. So I decided to modify it with adding in Sesame powder. (more nutritious than just pure white bread)
This is the white bread recipe, as adapted from Happy Home Baking. I had added and do some changes to the ingredients and methods to modify it to a Sesame bread for baking in my bread maker.
Ingredients
(makes one 600g loaf)
550g bread flour
50g Black Sesame powder
2 teaspoon instant yeast
2 tablespoon caster sugar
1.5 teaspoon salt
4 tablespoons milk powder
420ml water
20g butter, soften at room temperature
Method: (I used a bread maker to mix the ingredients and make into a dough) If you don't have a bread machine, READ THE 2ND PART OF THE STEPS)


I've been trying out with making white loaf from Happy Home Baking. And this recipe has turned out quite well each time. So I decided to modify it with adding in Sesame powder. (more nutritious than just pure white bread)
This is the white bread recipe, as adapted from Happy Home Baking. I had added and do some changes to the ingredients and methods to modify it to a Sesame bread for baking in my bread maker.
Black Sesame Bread loaf
Ingredients
(makes one 600g loaf)
550g bread flour
50g Black Sesame powder
2 teaspoon instant yeast
2 tablespoon caster sugar
1.5 teaspoon salt
4 tablespoons milk powder
420ml water
20g butter, soften at room temperature
Method: (I used a bread maker to mix the ingredients and make into a dough) If you don't have a bread machine, READ THE 2ND PART OF THE STEPS)
- Add all the ingredients, except the butter, into the bread machine mixing bowl, as according to the steps of adding wet/dry ingredients. Separate the yeast, away from the sugar and salt.
- Mix the ingredients in the bread maker dough function for about 5-10 mins till all the ingredients all combined to form a non-sticking dough.
- Add in the butter, and continue to use the dough function to knead it for about 30-40 mins. This will incorporate the butter into the dough.
- At the end of the kneading cycle, the dough will no longer sticks to the side of the bowl, and becomes smooth and elastic. To know if the dough is well kneaded through, do a window pane test.
- Window Pane test: Pinch a small piece of the dough, pull and stretch it. It should be elastic, and can be pulled away into a thin membrane without tearing/breaking apart. If it is, well done! The dough is now ready for proofing.
- Take the dough out of the bread machine mixing bowl and placed into a lightly greased (with vegetable oil) mixing bowl, cover with cling wrap and let proof in room temperature (around 28 to 30 degC) for about one hour, or until double in bulk. (In the cold winter now, I lightly warm the oven to around 40 degC and let it proof in there)
- Remove the dough from the bowl and give a few light kneading to press out the gas in the dough. (this will stop having big gas holes in the bread when baked) Smooth into round, cover with a damp cloth or cling wrap and let it rest for another 15-20mins.
- Roll the dough into a rectangle on a flat surface. Roll it up Swiss-roll style into a log. Remove the kneading blade in the bread maker mixing bowl. Place the log of dough, seam side down, into the bread maker mixing bowl.
- Now cover with damp cloth or cling wrap and leave the dough to proof for the second time for about 40 ~ 50mins, or until double in size, or when the dough has almost reached the rim of the tin.
- Pop the whole bread maker mixing bowl into the bread maker. Set the bread maker into baking mode. Bake for 50 mins. Remove from bread maker, unmold immediately and let cool completely before slicing.
- Mix milk and water.
- Stir bread flour, caster sugar, salt, and instant yeast in a mixing bowl.
- Add in milk mixture. Mix the ingredients with hand and slowly form into a dough.
- Transfer dough to a lightly floured work surface. Knead until the dough no longer sticks to your hand, becomes smooth and elastic. This should take about 20 mins. Do the window pane test: pinch a small piece of the dough, pull and stretch it. It should be elastic, and can be pulled away into a thin membrane without tearing/breaking apart. Wrap the butter in the dough and continue to knead until the butter fully incorporates into the dough.
- Place dough in a lightly greased (with vegetable oil) mixing bowl, cover with cling wrap and let proof in room temperature (around 28 to 30 degC) for about one hour, or until double in bulk. (In the cold winter now, I lightly warm the oven to around 40 degC and let it proof in there)
- Remove the dough from the bowl and give a few light kneading to press out the gas in the dough. (this will stop having big gas holes in the bread when baked) Smooth into round, cover with a damp cloth or cling wrap and let it rest for another 15-20mins.
- Roll the dough into a rectangle on a flat surface. Roll it up Swiss-roll style into a log. Place the log of dough, seam side down, into a well greased pullman tin (or a bread loaf tin).
- Now cover with damp cloth or cling wrap and leave the dough to proof for the second time for about 40 ~ 50mins, or until double in size, or when the dough has almost reached the rim of the tin.
- Baked in pre-heated oven at 180 degC for 30-35 mins or until golden brown. Remove from owen, unmold immediately and let cool completely before slicing.
Serve with butter and a good cup of coffee. Yum!
Eric and I had lunch that afternoon with toast with Egg n Onion Omelette. Delicious~!
Happy baking!
kcan
03 June 2013
Point location exam
Today is the big day for Eric. It is his first exam of the semester.
1st of the First~! With many (7 more semesters worth of exams) to come.
We spent the days leading up to and including the weekend, practicing points location. He needed to remember the location of >200+ points. Woow!
And how lucky he is that I had done exactly the same thing back in my good-old-uni-days. It's been almost 8 years from my first acupuncture exam. How quickly time flies.
For me, I felt quite privilege to be of a good help to him and it helps me to re-remember the many lost n forgotten points. *sheepish grin*
I think it is just like what many of my practicing friends and all TCM doctors will agree on. As we start practicing in the real world, we will start forming accumulating our own favourite points. Points which we have gain quite confident in their abilities and usefulness. And we will get into this routine of using them over n over again. That's why I love going to different Professional Development seminars! At those seminars, I can rediscovers points which I had neglected/forgotten/undermined/teacher's 'not-favourite' points.... or many other reasons.
Learning from people who had used and share their favourite points helps me to learn and using it in my own practise. Thus expanding and incorporating it into my own collection. =)
Hope that my darling boy will do well today. Don't be too nervous and forgets ALL the right location!
kcan
1st of the First~! With many (7 more semesters worth of exams) to come.
We spent the days leading up to and including the weekend, practicing points location. He needed to remember the location of >200+ points. Woow!
And how lucky he is that I had done exactly the same thing back in my good-old-uni-days. It's been almost 8 years from my first acupuncture exam. How quickly time flies.
For me, I felt quite privilege to be of a good help to him and it helps me to re-remember the many lost n forgotten points. *sheepish grin*
I think it is just like what many of my practicing friends and all TCM doctors will agree on. As we start practicing in the real world, we will start
Learning from people who had used and share their favourite points helps me to learn and using it in my own practise. Thus expanding and incorporating it into my own collection. =)
Hope that my darling boy will do well today. Don't be too nervous and forgets ALL the right location!
kcan
Subscribe to:
Posts (Atom)